
written by Nishtah Thomas
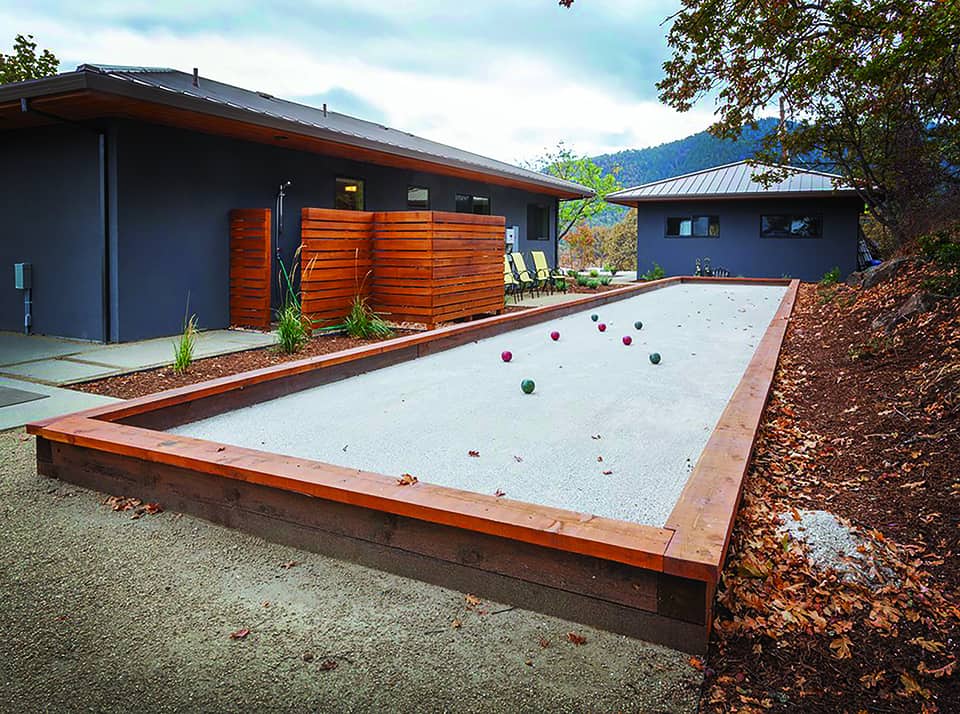
With summer approaching, many of us begin to think of outdoor fun and lawn games such as bocce. We asked Bellingham’s own Tom McNutt, aka Boccemon, to give us some useful tips and information about bocce ball and installing your own the bocce court. McNutt has been installing bocce courts for sixteen years. The demand for these courts, he said, is rising every year. “Bocce ball is not just a game for old Italian men and their families anymore. It has gone international,” McNutt said.
Boccemon’s Rain Country Blend was made specifically for bocce. It takes the traditional ground oyster shell, that was originally used as calcium stabilizer for the ground and combines the oyster shell with other key ingredients for Washington weather. Boccemon creates a solid surface, like a clay, that is more permeable and easier to maintain. “The surface is the most important part of any bocce ball court,” McNutt said, but, for those of us living in rainy areas, be sure to install the proper drainage system.
Boccemon helped us with the logistics of a DIY bocce ball court. They told us that, a 10’x60′ court surface typically takes three novices about two and a half hours to install and begin playing.
Every year in mid-April Bellingham hosts a big bocce ball tournament. This past week, on April the 21st, the Bellingham Sportsplex hosted the 16th annual Bellingham Bay Bocce Ball Tournament. The whole town came out from 9 a.m. to 4 p.m. for “Washington’s Largest One-Day Bocce Tournament”. Patrons were able to show their love of the game while also enjoying the beer garden sponsored by Boundary Bay Brewery. For all the Bocce Ball enthusiasts in the area keep this in mind for next year. Admission is free but all Bocce teams that sign up pay to help support the WDRC.
DIY Bocce Court
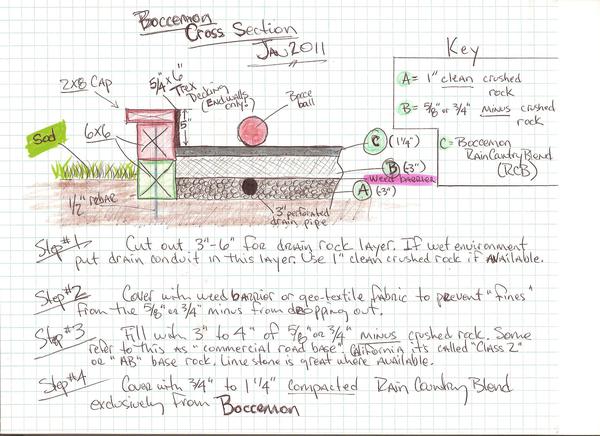
Step 1.
After mapping out the 10 feet by 60 feet area, Boccemon suggests to dig 3 to 6 inches deep into the base to level out the ground. Next fill the entire 3 or 6 inches with 1” clean crushed rock for drainage.
Step 2.
Cover this layer with Weed Barrier or Geo-Textile fabric to prevent the next smaller rock layer from dropping out.
Step 3.
Fill the next 3 to 4 inches with ¾ minus crushed rock, often referred to as commercial road base. Or use limestone, if available.
Step 4.
The perimeter of a court can be made from any number of different dimensional materials. From pressure treated timber bolted with rebar posts to pure concrete. Find the border that works best for you. Whatever you choose make sure the frame is stable and attached to the ground in some way. Pro Tip: The denser the perimeter wood, the truer the bank shots.
Step 5.
Cover the crushed rock layer with ¾” to 1 ¼” of Boccemon’s Rain Country Blend that works best as a surface for any Washingtonian. You can buy this oyster blend in bulk from Boccemon and they will also install it.
Step 6.
Boccemon likes to use an 18″x60″ piece of raised and expanded sheet metal to carve off the high spots and level the surface.
Step 7.
Finally, use a 7′ Maintenance Drag Broom ($250.00) to lightly brush out your new court and you’re good to go! Invite everyone over to admire your handiwork while playing and socializing!
For more bocce information head over to Boccemon!
Check out this video on How to Play Bocce Ball.
Read about the history of bocce.